Bulk Custom Object Import Endpoint Reference
When you have a large number of custom object records to import, it is best practice to import them asynchronously using the bulk API. This is done by importing a flat file that contains delimited records (comma, tab, or semicolon). The file can contain any number of records, provided its size is less than 10MB (otherwise an HTTP 413 status code is returned). The contents of the file will depend on your custom object definition. The first row always contains a header that lists the fields to map values of each row into. All field names in header must match an API name (as discussed below). Remaining rows contain the data to import, one record per row. The record operation is “insert or update” only.
Note: Beginning with the June 2019 release, Custom Object Import will now correctly reject attempts to submit non-integer values to integer fields.
Processing Limits
You are allowed to submit more than one bulk import request, within limits. Each request is added as a job to a FIFO queue to be processed. A maximum of 2 jobs are processed at the same time. A maximum of 10 jobs are allowed in the queue at any given time (including the 2 currently being processed). If you exceed the 10 job maximum, then a “1016, Too many imports” error is returned.
Custom Object Example
Before using the bulk API, you must first use the Marketo Admin UI to create your custom object. As an example, suppose that we created a “Car” custom object with “Color”, “Make”, “Model”, and “VIN” fields. Below are Admin UI screens showing the custom object. You can see that we used VIN field for deduplication. The API names are highlighted because they must be used when calling bulk API-related endpoints.
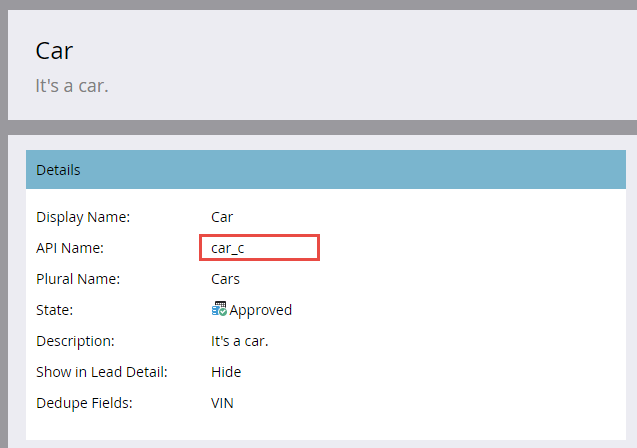
Here are the custom object fields as presented in the Admin UI.
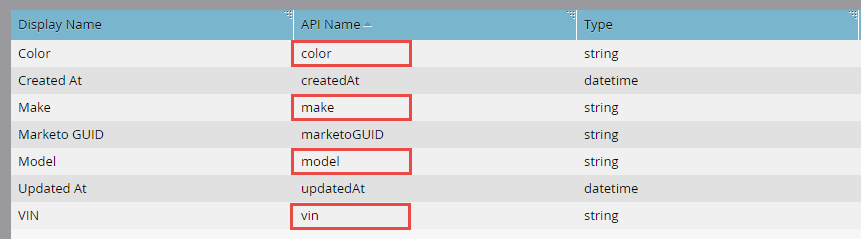
API Names
Note that you can retrieve API names programatically by passing the custom object API name to the Describe Custom Object endpoint.
|
1 |
/rest/v1/customobjects/{apiName}/describe.json |
|
1 2 3 4 5 6 7 8 9 10 11 12 13 14 15 16 17 18 19 20 21 22 23 24 25 26 27 28 29 30 31 32 33 34 35 36 37 38 39 40 41 42 43 44 45 46 47 48 49 50 51 52 53 54 55 56 57 58 59 60 61 62 63 64 65 66 67 68 69 70 71 72 73 74 |
{ "requestId": "46ff#15a686e66de", "result": [ { "name": "car_c", "displayName": "Car", "description": "It's a car.", "createdAt": "2017-02-22T19:55:51Z", "updatedAt": "2017-02-22T19:55:51Z", "idField": "marketoGUID", "dedupeFields": [ "vin" ], "searchableFields": [ [ "vin" ], [ "marketoGUID" ] ], "fields": [ { "name": "createdAt", "displayName": "Created At", "dataType": "datetime", "updateable": false }, { "name": "marketoGUID", "displayName": "Marketo GUID", "dataType": "string", "length": 36, "updateable": false }, { "name": "updatedAt", "displayName": "Updated At", "dataType": "datetime", "updateable": false }, { "name": "color", "displayName": "Color", "dataType": "string", "length": 255, "updateable": true }, { "name": "make", "displayName": "Make", "dataType": "string", "length": 255, "updateable": true }, { "name": "model", "displayName": "Model", "dataType": "string", "length": 255, "updateable": true }, { "name": "vin", "displayName": "VIN", "dataType": "string", "length": 255, "updateable": true } ] } ], "success": true } |
Import File
Now suppose that you want to import three “Car” custom object records. Using comma-delimited format (CSV), the file could look like this:
|
1 2 3 4 |
color,make,model,vin red,bmw,2002,WBA4R7C55HK895912 yellow,bmw,320i,WBA4R7C30HK896061 blue,bmw,325i,WBS3U9C52HP970604 |
Line 1 is the header, and lines 2-4 are the custom object data records.
Creating a Job
To make the bulk import request, you must include the API name of the custom object in the path to the Import Custom Objects endpoint. You must also include a “file” parameter that references the name of your import file, and a”format” parameter that specifies how your import file is delimited (“csv”, “tsv”, or “ssv”).
|
1 |
POST /bulk/v1/customobjects/{apiName}/import.json?format=csv |
|
1 2 3 4 |
Transfer-Encoding: chunked Content-Type: multipart/form-data; boundary=----WebKitFormBoundaryXjWP6BP8Ciq6bPeo Content-Length: 290 Host: <munchkinId>.mktorest.com |
|
1 2 3 4 5 6 7 8 9 |
------WebKitFormBoundaryXjWP6BP8Ciq6bPeo Content-Disposition: form-data; name="file"; filename="custom_object_import.csv" Content-Type: text/csv color,make,model,vin red,bmw,2002,WBA4R7C55HK895912 yellow,bmw,320i,WBA4R7C30HK896061 blue,bmw,325i,WBS3U9C52HP970604 ------WebKitFormBoundaryXjWP6BP8Ciq6bPeo-- |
|
1 2 3 4 5 6 7 8 9 10 11 |
{ "requestId": "c015#15a68a23418", "result": [ { "batchId": 1013, "status": "Queued", "objectApiName": "car_c" } ], "success": true } |
In this example, we specified “csv” format and named our import file “custom_object_import.csv”.
Notice in the response to our call, here is no listing of successes or failures like you would get back from Sync Custom Objects endpoint. Instead, you receive a batchId. This is because the call is asynchronous, and can return a status of “Queued”, “Importing”, or “Failed”. You should retain the batchId so that you can get status of the import job, or retrieve failures and/or warnings upon completion. Note that the batchId remains valid for 7 days.
A simple way to replicate the bulk import request is to use curl from the command line:
|
1 |
curl -X POST -i -F format='csv' -F file='@custom_object_import.csv' -F access_token='<Access Token>' <REST API Endpoint URL>/bulk/v1/customobjects/car_c/import.json |
Where the import file “custom_object_import.csv” contains the following:
|
1 2 3 4 |
color,make,model,vin red,bmw,2002,WBA4R7C55HK895912 yellow,bmw,320i,WBA4R7C30HK896061 blue,bmw,325i,WBS3U9C52HP970604 |
Polling Job Status
Once the import job has been created, you need to query its status. It is best practice to poll the import job every 5-30 seconds. Do this by passing the API name of the custom object and the batchId in the path to the Get Import Custom Object Status endpoint.
|
1 |
GET /bulk/v1/customobjects/{apiName}/import/{batchId}/status.json |
|
1 2 3 4 5 6 7 8 9 10 11 12 13 14 15 16 17 |
{ "requestId": "2a5#15a68dd9be1", "result": [ { "batchId": 1013, "operation": "import", "status": "Complete", "objectApiName": "car_c", "numOfObjectsProcessed": 3, "numOfRowsFailed": 0, "numOfRowsWithWarning": 0, "importTime": "2 second(s)", "message": "Import succeeded, 3 records imported (3 members)" } ], "success": true } |
This response shows a completed import, but the status can be one of: Complete, Queued, Importing, Failed. If the job has completed, you will have a listing of the number of rows processed, with failures, and with warnings. The message attribute is also a good place to look for additional job information.
Failures
Failures are indicated by the numOfRowsFailed attribute in Get Import Custom Object Status response. If numOfRowsFailed is greater than zero, then that value indicates the number of failures that occurred. Call Get Import Custom Object Failures endpoint to obtain a file with failure detail. Again, you must pass the custom object API name and batchId in the path. If no failure file exists, an HTTP 404 status code is returned.
Continuing with the example, we can force a failure by modifying the header and change “vin” to ” vin” (by adding a space between the comma and “vin”).
|
1 |
color,make,model, vin |
When we re-import and check the status we see this response with numRowsFailed : 3. This indicates three failures.
|
1 |
GET /bulk/v1/customobjects/car_c/import/{batchId}/status.json |
|
1 2 3 4 5 6 7 8 9 10 11 12 13 14 15 16 17 |
{ "requestId": "12260#15a68f491ed", "result": [ { "batchId": 1016, "operation": "import", "status": "Complete", "objectApiName": "car_c", "numOfObjectsProcessed": 0, "numOfRowsFailed": 3, "numOfRowsWithWarning": 0, "importTime": "1 second(s)", "message": "Import completed with errors, 0 records imported (0 members), 3 failed" } ], "success": true } |
Now we’ll make Get Import Custom Object Failures endpoint call to get additional failure detail:
|
1 |
GET /bulk/v1/customobjects/car_c/import/{batchId}/failures.json |
|
1 2 3 4 |
color,make,model, vin,Import Failure Reason red,bmw,2002,WBA4R7C55HK895912,missing.dedupe.fields yellow,bmw,320i,WBA4R7C30HK896061,missing.dedupe.fields blue,bmw,325i,WBS3U9C52HP970604,missing.dedupe.fields |
And we can see that we’re missing our deduplication field vin.
Warnings
Warnings are indicated by the numOfRowsWithWarning attribute in Get Import Custom Object Status response. If numOfRowsWithWarning is greater than zero, then that value indicates the number of warnings that occurred. Call Get Import Custom Object Warnings endpoint to obtain a file with warning detail. Again, you must pass the custom object API name and batchId in the path. If no warning file exists, an HTTP 404 status code is returned.
|
1 |
GET /bulk/v1/customobjects/car_c/import/{batchId}/warnings.json |