This article provides information on how to install and set up Marketo’s native SDK to integrate your mobile app with our platform.
Prerequisites
Add an application in Marketo Admin (obtain your application Secret Key and Munchkin Id).
SDK Integration
Android SDK Integration
Add Marketo SDK dependency with latest version: In the application level build.gradle file, under the dependencies section add (including the appropriate version of Marketo SDK)
|
1 |
implementation 'com.marketo:MarketoSDK:0.x.x' |
|
1 2 3 4 5 6 |
build script { repositories { google() mavencentral() } } |
iOS SDK Integration
Before you create a bridge for your React Native project, It’s important that you set up our SDK in your Xcode project.
SDK integration – Using CocoaPods
Using our iOS SDK in your app is easy. Perform the following steps to set it up in your app’s Xcode project using CocoaPods, so that you can integrate our platform with your app.
Download CocoaPods – Distributed as a Ruby gem, is a dependency manager for Objective-C and Swift that simplifies the process of using third-party libraries in your code, such as the iOS SDK that we provide.
We will provide steps on how to use CocaPods to get Marketo’s iOS SDK and use the SDK in your app.
To download and install it, launch the terminal on your Mac and run the following command on it:
Install CocoaPods.
$ sudo gem install cocoapods
Open your Podfile. (Inside iOS folder of the ReactNative project)
$ open -a Xcode Podfile
Add the following line to your Podfile.
$ pod 'Marketo-iOS-SDK'
Save and close your Podfile.
Download and install Marketo iOS SDK.
$ pod install
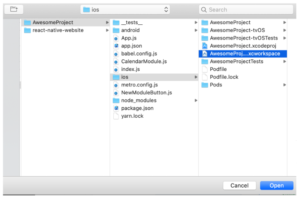
Open workspace in Xcode.
$ open App.xcworkspace
Native Module Installation Instructions
Sometimes a React Native app needs to access a native platform API that is not available by default in JavaScript, for example the native APIs to access Apple or Google Pay. Maybe you want to reuse some existing Objective-C, Swift, Java or C++ libraries without having to reimplement it in JavaScript, or write some high performance, multi-threaded code for things like image processing.
The NativeModule system exposes instances of Java/Objective-C/C++ (native) classes to JavaScript (JS) as JS objects, thereby allowing you to execute arbitrary native code from within JS. While we don’t expect this feature to be part of the usual development process, it is essential that it exists. If React Native doesn’t export a native API that your JS app needs you should be able to export it yourself!
- Create Native Module Bridge
React Native bridge is used for communicating between the JSX and native app layers. In our case, the host app will be able to write the JSX code that can invoke the Marketo SDK’s methods.
Android
This file contains the wrapper methods that can call the Marketo SDK’s methods internally with parameters that you provide.
|
1 2 3 4 5 6 7 8 9 10 11 12 13 14 15 16 17 18 19 20 21 22 23 24 25 26 27 28 29 30 31 32 33 34 35 36 37 38 39 40 41 42 43 44 45 46 47 48 49 50 51 52 53 54 55 56 57 58 59 60 61 62 63 64 65 66 67 68 69 70 71 72 73 74 75 76 77 78 79 80 |
public class RNMarketoModule extends ReactContextBaseJavaModule { final Marketo marketoSdk; RNMarketoModule(ReactApplicationContext context) { super(context); marketoSdk = Marketo.getInstance(context); } @NonNull @Override public String getName() { return "RNMarketoModule"; } @ReactMethod public void associateLead(ReadableMap leadData) { MarketoLead mLead = new MarketoLead(); try { mLead.setCity(leadData.getString(MarketoLead.KEY_CITY)); mLead.setFirstName(leadData.getString(MarketoLead.KEY_FIRST_NAME)); mLead.setLastName(leadData.getString(MarketoLead.KEY_LAST_NAME)); mLead.setAddress(leadData.getString(MarketoLead.KEY_ADDRESS)); mLead.setEmail(leadData.getString(MarketoLead.KEY_EMAIL)); mLead.setBirthDay(leadData.getString(MarketoLead.KEY_BIRTHDAY)); mLead.setCountry(leadData.getString(MarketoLead.KEY_COUNTRY)); mLead.setFacebookId(leadData.getString(MarketoLead.KEY_FACEBOOK)); mLead.setGender(leadData.getString(MarketoLead.KEY_GENDER)); mLead.setState(leadData.getString(MarketoLead.KEY_STATE)); mLead.setPostalCode(leadData.getString(MarketoLead.KEY_POSTAL_CODE)); mLead.setTwitterId(leadData.getString(MarketoLead.KEY_TWITTER)); marketoSdk.associateLead(mLead); } catch (MktoException e){ } } @ReactMethod public void setSecureSignature(ReadableMap readableMap) { MarketoConfig.SecureMode secureMode = new MarketoConfig.SecureMode(); secureMode.setAccessKey(readableMap.getString("accessKey")); secureMode.setEmail(readableMap.getString("email")); secureMode.setSignature(readableMap.getString("signature")); secureMode.setTimestamp(readableMap.getInt("timeStamp")); marketoSdk.setSecureSignature(secureMode); } @ReactMethod public void initializeSDK(String munchkinId, String appSecreteKey){ marketoSdk.initializeSDK(munchkinId,appSecreteKey); } @ReactMethod public void initializeMarketoPush(String projectId){ marketoSdk.initializeMarketoPush( projectId); } @ReactMethod public void initializeMarketoPush(String projectId, String channelName){ marketoSdk.initializeMarketoPush( projectId, channelName); } @ReactMethod public void uninitializeMarketoPush(){ marketoSdk.uninitializeMarketoPush(); } @ReactMethod public void reportAction(String action){ Marketo.reportAction(action, null); } @ReactMethod public void reportAction(String action, ReadableMap readableMap){ MarketoActionMetaData marketoActionMetaData = new MarketoActionMetaData(); marketoActionMetaData.setActionDetails(readableMap.getString("setMetric")); marketoActionMetaData.setActionMetric(readableMap.getString("setLength")); marketoActionMetaData.setActionLength(readableMap.getString("actionDetails")); marketoActionMetaData.setActionType(readableMap.getString("actionType")); Marketo.reportAction(action, marketoActionMetaData); } } |
Register the Package
Let react-native know about the Marketo package.
|
1 2 3 4 5 6 7 8 9 10 11 12 13 14 15 16 17 18 |
public class MarketoPluginPackage implements ReactPackage { @NonNull @Override public List createNativeModules(@NonNull ReactApplicationContext reactContext) { List modules = new ArrayList<>(); modules.add(new RNMarketoModule(reactContext)); return modules; } @NonNull @Override public List createViewManagers(@NonNull ReactApplicationContext reactContext) { return Collections.emptyList(); } } |
To complete the package registration, add the MarketoPluginPackage to the React package list in the Application Class:
|
1 2 3 4 5 6 7 8 9 10 11 12 13 14 15 16 17 18 |
public class MainApplication extends Application implements ReactApplication { private final ReactNativeHost mReactNativeHost = new ReactNativeHost(this) { @Override public boolean getUseDeveloperSupport() { return BuildConfig.DEBUG; } @Override protected List getPackages() { @SuppressWarnings("UnnecessaryLocalVariable") List packages = new PackageList(this).getPackages(); packages.add(new MarketoPluginPackage()); //Add the Marketo Package here. // Packages that cannot be autolinked yet can be added manually here, for example: return packages; } } |
iOS
Create Custom Native Module Files
In the following guide you will create a native module, RNMarketoModule, that will allow you to access Marketo’s APIs from JavaScript.
1. To get started, open up the iOS project within your React Native application in Xcode. You can find your iOS project here within a React Native app. We recommend using Xcode to write your native code. Xcode is built for iOS development, and using it will help you to quickly resolve smaller errors like code syntax.
2. Create our main custom native module header and implementation files. Create a new file called MktoBridge.h
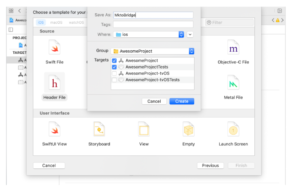
and add the following to it:
|
1 2 3 4 5 6 7 8 9 10 11 12 13 14 15 16 |
// // MktoBridge.h // // Created by Marketo, An Adobe company. // #import <Foundation/Foundation.h> #import <React/RCTBridgeModule.h> NS_ASSUME_NONNULL_BEGIN @interface MktoBridge : NSObject @end NS_ASSUME_NONNULL_END |
Next up, let’s start implementing the native module. Create the corresponding implementation file, MktoBridge.m, in the same folder and include the following content:
|
1 2 3 4 5 6 7 8 9 10 11 12 13 14 15 16 17 18 19 20 21 22 23 24 25 26 27 28 29 30 31 32 33 34 35 36 37 38 39 40 41 42 43 44 45 46 47 48 49 50 51 52 53 54 55 56 57 58 59 60 61 62 63 64 65 66 67 68 69 |
// // MktoBridge.m // // Created by Marketo, An Adobe company. // #import "MktoBridge.h" #import <MarketoFramework/MarketoFramework.h> #import <React/RCTBridge.h> #import "ConstantStringsHeader.h" @implementation MktoBridge RCT_EXPORT_MODULE(RNMarketoModule); +(BOOL)requiresMainQueueSetup{ return NO; } RCT_EXPORT_METHOD(initializeWithMunchkin:(NSString *) munchkinId Secret: (NSString *) secretKey andFrameworkType : (NSString *) frameworkType{ [[Marketo sharedInstance] initializeWithMunchkinID:munchkinId appSecret:secretKey mobileFrameworkType:frameworktype launchOptions:nil]; } RCT_EXPORT_METHOD(reportAction:(NSString *)actionName withMetaData:(NSDictionary *)metaData){ MarketoActionMetaData *meta = [[MarketoActionMetaData alloc] init]; [meta setType:[metaData objectForKey:KEY_ACTION_TYPE]]; [meta setDetails:[metaData objectForKey:KEY_ACTION_DETAILS]]; [meta setLength:[metaData valueForKey:KEY_ACTION_LENGTH]]; [meta setMetric:[metaData valueForKey:KEY_ACTION_METRIC]]; [[Marketo sharedInstance] reportAction:actionName withMetaData:meta]; } RCT_EXPORT_METHOD(associateLead:(NSDictionary *)leadDetails){ MarketoLead *lead = [[MarketoLead alloc] init]; if ([leadDetails objectForKey:KEY_EMAIL] != nil) { [lead setEmail:[leadDetails objectForKey:KEY_EMAIL]]; } if ([leadDetails objectForKey:KEY_FIRST_NAME] != nil) { [lead setFirstName:[leadDetails objectForKey:KEY_FIRST_NAME]]; } if ([leadDetails objectForKey:KEY_LAST_NAME] != nil) { [lead setLastName:[leadDetails objectForKey:KEY_LAST_NAME]]; } if ([leadDetails objectForKey:KEY_CITY] != nil) { [lead setCity:[leadDetails objectForKey:KEY_CITY]]; } [[Marketo sharedInstance] associateLead:lead]; } RCT_EXPORT_METHOD(uninitializeMarketoPush){ [[Marketo sharedInstance] unregisterPushDeviceToken]; } RCT_EXPORT_METHOD(reportAll){ [[Marketo sharedInstance] reportAll]; } RCT_EXPORT_METHOD(setSecureSignature:(NSDictionary *)secureSignature){ MKTSecuritySignature *secSignature = [[MKTSecuritySignature alloc] initWithAccessKey:[secureSignature objectForKey:KEY_ACCESSKEY] signature:[secureSignature objectForKey:KEY_SIGNATURE] timestamp: [secureSignature objectForKey:KEY_EMAIL] email:[secureSignature objectForKey:KEY_EMAIL]]; [[Marketo sharedInstance] setSecureSignature:secSignature]; } @end |
Find a place in your application where you would like to add a call to the native module’s createCalendarEvent() method. Below is an example of a component, NewModuleButton you can add in your app. You can invoke the native module inside NewModuleButton’s onPress() function.
|
1 2 3 4 5 6 7 8 9 10 11 12 13 14 |
import React from 'react'; import { NativeModules, Button } from 'react-native'; const NewModuleButton = () => { const onPress = () => { console.log('We will invoke the native module here!'); }; return ( <button title="Click to invoke your native module!"></button> ); }; export default NewModuleButton; |
This JavaScript file loads the native module to the JavaScript layer.
|
1 2 3 4 5 |
import React from 'react'; import {Node} from 'react'; import { NativeModules } from 'react-native'; const { RNMarketoModule } = NativeModules; |
Once the above files are placed correctly, we can import the js module in any js class and call its methods directly. For example:
|
1 2 3 4 5 6 7 8 9 10 11 12 13 14 15 16 17 |
// Initialize marketo SDK with Munchkin & Seretkey you have from step 1. RNMarketoModule.initializeSDK("MunchkinID","SecreteKEY","FrameworkType") //You can create a Marketo Lead by calling the associateLead function. RNMarketoModule.associateLead({ email: "", firstName: "", lastName:"", city:""}) //You can report any user performed action by calling the reportaction function. RNMarketoModule.reportAction("Bought Shirt", {actionType:"Shopping", actionDetails: "Red Shirt", setLength : 20, setMetric : 30 }) //You can set Secure Signature by calling this method. RNMarketoModule.setSecureSignature({accessKey: "Key102", email: "testleadrk@001.com", signature : "asdfghjkloiuytds", timeStamp: "12345678987654"}) //This function will Enable user notifications (Only Android) RNMarketoModule.initializeMarketoPush("350312872033", "MKTO") //The token can also be unregistered on logout. RNMarketoModule.uninitializeMarketoPush() |
Set up push notifications for Android
Step 1: Initialize Push with Project ID and Channel name
|
1 |
RNMarketoModule.initializeMarketoPush("ProjectId", "Channel_name") |
Step 2: Add the following Service to AndroidManifest.xml
12345678<service android:exported="true" android:name=".MyFirebaseMessagingService" android:stopWithTask="true"><intent-filter><action android:name="com.google.firebase.INSTANCE_ID_EVENT"/></intent-filter/><intent-filter><action android:name="com.google.firebase.MESSAGING_EVENT"/></intent-filter/></activity/>
Step3: Create a class with name FirebaseMessagingService.java and Add the following code
|
1 2 3 4 5 6 7 8 9 10 11 12 13 14 15 16 17 18 19 |
import com.google.firebase.messaging.FirebaseMessagingService; import com.google.firebase.messaging.RemoteMessage; import com.marketo.Marketo; public class MyFirebaseMessagingService extends FirebaseMessagingService { @Override public void onNewToken(String token) { super.onNewToken(token); Marketo marketoSdk = Marketo.getInstance(this.getApplicationContext()); marketoSdk.setPushNotificationToken(token); } @Override public void onMessageReceived(RemoteMessage remoteMessage) { Marketo marketoSdk = Marketo.getInstance(this.getApplicationContext()); marketoSdk.showPushNotification(remoteMessage); } } |
Set up push notifications for iOS
The following permissions must be enabled in your Xcode project to send push notifications to the user’s device.
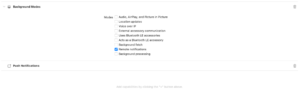
To send push notifications, add Push Notifications capability to your app target as shown in this documentation..
After adding the Push Notifications capability and enabling Remote notifications background mode, it should look like this.
|
1 |
#import <MarketoFramework/MarketoFramework.h> |
Add UNUserNotificationCenterDelegate to AppDelegate Interface as follows to handle Delegates
|
1 2 3 |
@interface AppDelegate () <UNUserNotificationCenterDelegate> @end |
Register for remote notifications in didFinishLaunchingWithOptions method.
|
1 2 3 4 5 6 7 8 9 10 11 12 13 14 15 16 17 18 19 20 21 22 23 24 25 26 27 28 29 30 31 32 33 34 35 36 37 38 |
- (BOOL)application:(UIApplication *)application didFinishLaunchingWithOptions:(NSDictionary *)launchOptions { #ifdef FB_SONARKIT_ENABLED InitializeFlipper(application); #endif RCTBridge *bridge = [[RCTBridge alloc] initWithDelegate:self launchOptions:launchOptions]; RCTRootView *rootView = [[RCTRootView alloc] initWithBridge:bridge moduleName:@"HelloRN" initialProperties:nil]; // asking user permission to send push notifications [self registerForRemoteNotifications]; self.window = [[UIWindow alloc] initWithFrame:[UIScreen mainScreen].bounds]; UIViewController *rootViewController = [UIViewController new]; rootViewController.view = rootView; self.window.rootViewController = rootViewController; [self.window makeKeyAndVisible]; return YES; } - (void)registerForRemoteNotifications { UNUserNotificationCenter *center = [UNUserNotificationCenter currentNotificationCenter]; center.delegate = self; [center requestAuthorizationWithOptions:(UNAuthorizationOptionSound | UNAuthorizationOptionAlert | UNAuthorizationOptionBadge) completionHandler:^(BOOL granted, NSError * _Nullable error){ if(!error){ dispatch_async(dispatch_get_main_queue(), ^{ [[UIApplication sharedApplication] registerForRemoteNotifications]; }); } else{ NSLog(@"failed"); } }]; } |
|
1 2 3 4 5 6 7 8 9 10 11 12 13 14 15 16 17 18 19 20 21 22 |
-(void)userNotificationCenter:(UNUserNotificationCenter *)center willPresentNotification:(UNNotification *)notification withCompletionHandler:(void (^)(UNNotificationPresentationOptions options))completionHandler{ completionHandler(UNAuthorizationOptionSound | UNAuthorizationOptionAlert | UNAuthorizationOptionBadge); } - (void)userNotificationCenter:(UNUserNotificationCenter *)center didReceiveNotificationResponse:(UNNotificationResponse *)response withCompletionHandler:(void(^)(void))completionHandler { [[Marketo sharedInstance] userNotificationCenter:center didReceiveNotificationResponse:response withCompletionHandler:completionHandler]; } - (void)application:(UIApplication *)application didRegisterForRemoteNotificationsWithDeviceToken:(NSData *)deviceToken { // Register the push token with Marketo [[Marketo sharedInstance] registerPushDeviceToken:deviceToken]; } - (void)applicationWillTerminate:(UIApplication *)application { [[Marketo sharedInstance] unregisterPushDeviceToken]; } -(void)application:(UIApplication *)application didFailToRegisterForRemoteNotificationsWithError:(NSError *)error{ NSLog(@"didFailToRegisterForRemoteNotificationsWithError"); } |
4. Add Test Devices
Android
Add “MarketoActivity” to AndroidManifest.xml file inside application tag.
12345678<activity android:name="com.marketo.MarketoActivity" android:configChanges="orientation|screenSize" android:exported=“true”><intent-filter android:label="MarketoActivity"><action android:name="android.intent.action.VIEW"/><category android:name="android.intent.category.DEFAULT"/><category android:name="android.intent.category.BROWSABLE"/><data android:host="add_test_device" android:scheme="mkto"/></intent-filter/></activity/>
iOS
1. Select Project > Target > Info > URL Types.
2. Add identifier: ${PRODUCT_NAME}
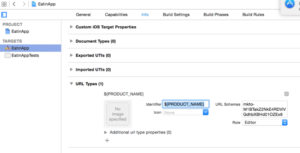
3. Set URL Schemes: mkto-<Secret Key>
iOS – Handle Custom Url Type/Deeplinks in AppDelegate
|
1 2 3 4 5 6 7 8 |
- (BOOL)application:(UIApplication *)app openURL:(NSURL *)url options:(NSDictionary<UIApplicationOpenURLOptionsKey,id> *)options{ return [[Marketo sharedInstance] application:app openURL:url options:options]; } |
Constants Used
These constants are used when calling API from javascript. You need to create constant files and add the following.
|
1 2 3 4 5 6 7 8 9 10 11 12 13 14 15 16 17 18 19 20 21 22 23 24 25 26 27 |
// Lead attributes. static NSString *const KEY_FIRST_NAME = @"firstName"; static NSString *const KEY_LAST_NAME = @"lastName"; static NSString *const KEY_ADDRESS = @"address"; static NSString *const KEY_CITY = @"city"; static NSString *const KEY_STATE = @"state"; static NSString *const KEY_COUNTRY = @"country"; static NSString *const KEY_GENDER = @"gender"; static NSString *const KEY_EMAIL = @"email"; static NSString *const KEY_TWITTER = @"twitterId"; static NSString *const KEY_FACEBOOK = @"facebookId"; static NSString *const KEY_LINKEDIN = @"linkedinId"; static NSString *const KEY_LEAD_SOURCE = @"leadSource"; static NSString *const KEY_BIRTHDAY = @"dateOfBirth"; static NSString *const KEY_FACEBOOK_PROFILE_URL = @"facebookProfileURL"; static NSString *const KEY_FACEBOOK_PROFILE_PIC = @"facebookPhotoURL"; // Custom actions static NSString *const KEY_ACTION_TYPE = @"actionType"; static NSString *const KEY_ACTION_DETAILS = @"actionDetails"; static NSString *const KEY_ACTION_LENGTH = @"setLength"; static NSString *const KEY_ACTION_METRIC = @"setMetric"; //Secure Signature static NSString *const KEY_ACCESSKEY = @"accessKey"; static NSString *const KEY_SIGNATURE = @"signature"; static NSString *const KEY_TIMESTAMP = @"timeStamp"; |
Example Usage
|
1 2 |
//You can create a Marketo Lead by calling the associateLead function. RNMarketoModule.associateLead({ email: "", firstName: "", lastName:"", city:""}) |