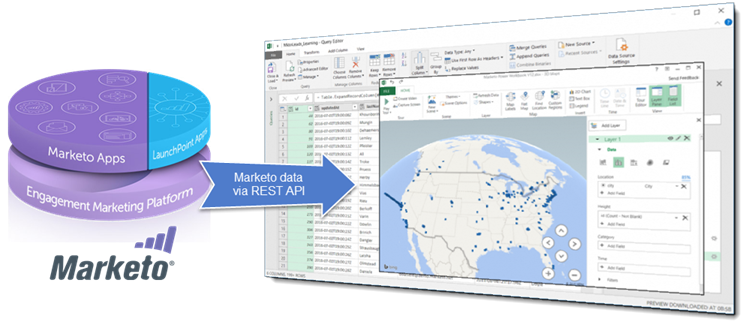
This is the first of a series of articles that explain how to leverage the Power BI technology built into Microsoft Excel to create a true self-service business analytics experience with Marketo.
With the concepts covered in these articles, you’ll be able to:
- Import data from Marketo into Excel
- Import and combine data from other sources (SaaS applications, databases, flat files, etc.)
- Shape data for business needs and analysis purpose
- Refresh on demand the data from Excel
- Create calculated columns and measures using formulas
- Create relationships between heterogeneous data
- Analyze data and build advanced reports with Pivot Tables and Pivot Charts
- Produce stunning data visualizations
Power Query for Excel
This first article covers the data import and shaping process using Power Query technology. Power Query is a data connection technology that enables you to discover, connect, combine, and refine data sources to meet your analysis needs. Features in Power Query are available in Excel and Power BI Desktop.
Power Query can connect to many data sources such as databases, Facebook, Salesforce, MS Dynamics CRM, etc. Marketo isn’t supported out of the box, but fortunately we can use Marketo REST APIs for remote execution of many of the system’s capabilities, and Power Query comes with a rich set of formulas (informally known as “M”) allowing you to script a custom data source.
Custom Connector
Scripting a single REST API call is trivial with Power Query, but it becomes more challenging to handle the following requirements:
- Access token management including authentication mechanism and periodic token refresh
- Pagination mechanism for large set of data
- Error handling
This article explains how to build a robust custom connector that can consume the REST APIs of Marketo in order to pull all kinds of data (Leads, Activities, Custom Objects, Programs, etc.). Your only restriction will be down to your Marketo API daily request limit.
The concepts explained here focus on Marketo, but they could also be used to to integrate other SaaS solutions that provide a REST API.
Prerequisites
Power Query
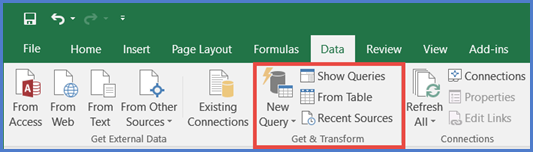
Prior to the release of Excel 2016, Microsoft Power Query for Excel functioned as an Excel add-in that was downloaded and installed on Excel 2010 or Excel 2013. From Excel 2016, this technology is a native feature integrated into the ‘Data’ ribbon under ‘Get & Transform’ section.
All of the scripts produced for this article have been tested on Excel 2016 for Windows. The concepts should be the same for Excel 2013 or Excel 2010 but some adaptations could be required.
Power Query is currently only available on the Microsoft Windows version of Excel; the Mac version is unfortunately not supported.
Marketo
Power Query will use the Marketo REST APIs to access data from Marketo. In order to use these APIs, you’ll need an API User and a Custom Service that you can create yourself if you are administrator of your Marketo instance. If not, then an administrator will need to provide those to you.
A step by step explanation of how to create the Marketo API User and the Custom Service can be found here.
Once you’re done, you should have the following credentials in order to invoke the Marketo REST APIs: Client Id and Client Secret.
The REST API Endpoint can be found on the REST API section of the Web Services Admin in Marketo and it should have the following pattern:
https://XXX-XXX-XXX.mktorest.com/rest
Marketo has a Daily Request Limit for its API and this limit can be found in the Web Services Admin along with a consumption report. Make sure to never exceed your daily limit when you design your queries as you may miss some data in your reports.
Power Query Workbook Creation
Let start with a new Excel workbook. We create a specific configuration worksheet for declaring all the Marketo REST API Settings.
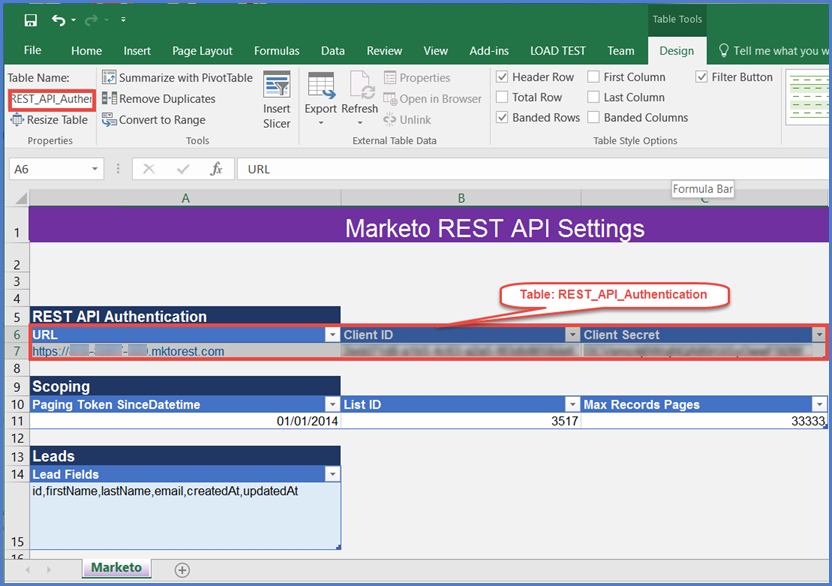
In this worksheet, we create three tables:
1. Table ‘REST_API_Authentication’ with the columns:
URL: your Marketo REST API Endpoint.
Client ID: from your Marketo REST API OAuth2.0 credential.
Client Secret: from your Marketo REST API OAuth2.0 credential.
2. Table ‘Scoping’ with the columns:
Paging Token SinceDatetime: a date following the ISO 8601 standard date notation (e.g. “2016-10-06T13:22:17-08:00”, “2016-10-06” are valid date/time) that is used to fetch Marketo activities since a given period, thanks to an initial ‘date-based’ paging token. This date is mainly used to limit the amount of data to import into the workbook.
List ID: the ID of a static list in Marketo that reference all the leads/contacts we are dealing with. This static list can be managed freely in Marketo (e.g. a smart campaign can feed it periodically or in real time with leads and contacts). In order to get the ID of a static list, open it in Marketo and get its numerical ID from the URL, e.g. https://myorg.marketo.com/#ST3517A1LA1, List ID=3517.
Max Records Pages: this is used for our pseudo-recursive algorithms that iterates through the Marketo output data, using ‘position-based’ paging tokens, with a capacity of 300 max records per page. Since this our interest to get as many records per page as possible, we’ll stick to 300. So typically a Max Records Pages set to 33.333 means a capacity of 33.333 X 300 = 9.9999 million records; but it also means 33.333 K on your Marketo API Daily Request Limit. The algorithms will stop anyway as soon as all data from the queries are obtained, so this parameter is just a safety limit for a loop.
3. Table ‘Leads’ with the column:
Lead Fields: comma separated lead fields to gather from Marketo when querying the leads and contacts.
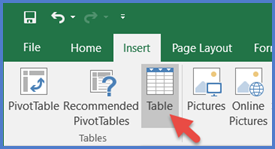
Declaring a table in Excel is simple. Enter two rows in the spreadsheet with the columns names and values, highlight with the mouse the perimeter of the table, and select the icon Table in the ‘Insert’ menu, and then give it a name.
The names given to the tables and their columns are important as they will be called directly by our scripts.
Authentication and Access Token
About Marketo REST API Authentication
Marketo’s REST APIs are authenticated with 2-legged OAuth 2.0. Client IDs and Client Secrets are provided by custom services that you define. Each custom service is owned by an API-Only user which has a set of roles and permissions which authorize the service to perform specific actions. An access token is associated with a single custom service.
The full Authentication mechanism is documented here on the Marketo Developer site.
When an access token is originally created, it’s lifespan is 3600 seconds or 1 hour. Each consecutive authentication call for the same custom service returns the current access token with its remaining lifespan. Once the token is expired, the authentication returns a brand new access token.
Managing access token expiration is important to ensure that your integration works smoothly and prevents unexpected authentication errors from occurring during normal operation.
Create Query
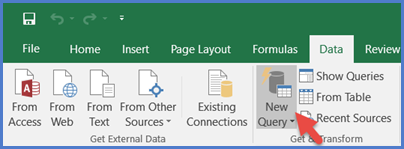
Create a new query by clicking the ‘New Query’ icon from the ‘Get&Transform’ section of the ‘Data’ Menu. Select a blank query to start with and give it a name such as ‘MktoAccessToken’.
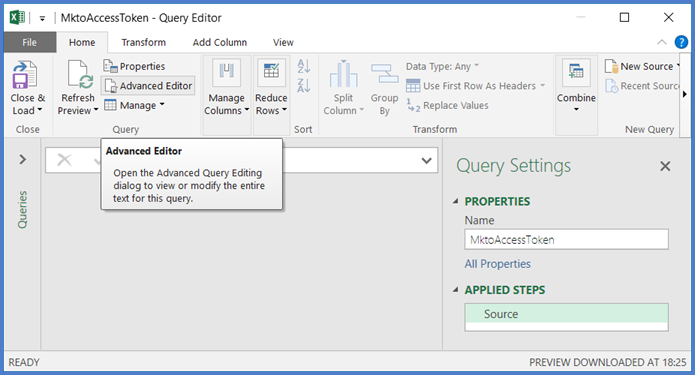
Launch the Advanced Editor from the Query Editor, so you can script manually some Power Query formulas.
Enter the following code in the advanced editor:
|
1 2 3 4 5 6 7 8 9 10 11 12 13 14 15 |
let // Get url and credentials from config worksheet - Table REST_API_Authentication mktoUrlStr = Excel.CurrentWorkbook(){[Name="REST_API_Authentication"]}[Content]{0}[URL], clientIdStr = Excel.CurrentWorkbook(){[Name="REST_API_Authentication"]}[Content]{0}[Client ID], clientSecretStr = Excel.CurrentWorkbook(){[Name="REST_API_Authentication"]}[Content]{0}[Client Secret], // Calling Marketo API Get Access Token getAccessTokenUrl = mktoUrlStr & "/identity/oauth/token?grant_type=client_credentials&client_id=" & clientIdStr & "&client_secret=" & clientSecretStr, TokenJson = try Json.Document(Web.Contents(getAccessTokenUrl)) otherwise "Marketo REST API Authentication failed, please check your credentials", // Parsing access token accessTokenStr = TokenJson [access_token] in accessTokenStr |
The comments embedded in the source code, preceded by “//” make the code self-explanatory. If you need any function reference, please check out the links provided in the Reference section of this article.
Click the button “Done”.
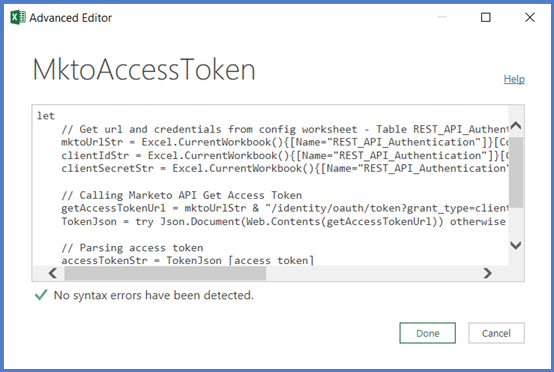
Check that the Access token is displayed successfully in output for the final applied step ‘accessTokenStr’.

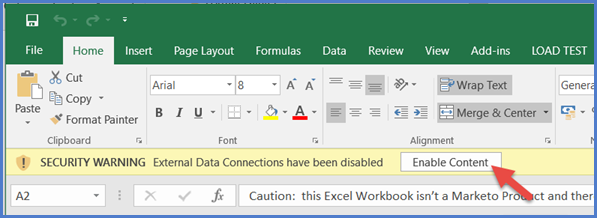
One quick comment about the security in Excel; you may be asked occasionally to enable External Data Connections from the yellow banner. This is required in order to let the Queries work properly.
Converting Query into a Function
Return to the advanced Editor and wrap your code with the following function declaration:
|
1 2 3 4 5 6 7 8 9 10 11 12 13 14 15 16 17 18 19 20 |
let FnMktoGetAccessToken =()=> let // Get url and credentials from config worksheet - Table REST_API_Authentication mktoUrlStr = Excel.CurrentWorkbook(){[Name="REST_API_Authentication"]}[Content]{0}[URL], clientIdStr = Excel.CurrentWorkbook(){[Name="REST_API_Authentication"]}[Content]{0}[Client ID], clientSecretStr = Excel.CurrentWorkbook(){[Name="REST_API_Authentication"]}[Content]{0}[Client Secret], // Calling Marketo API Get Access Token getAccessTokenUrl = mktoUrlStr & "/identity/oauth/token?grant_type=client_credentials&client_id=" & clientIdStr & "&client_secret=" & clientSecretStr, TokenJson = try Json.Document(Web.Contents(getAccessTokenUrl)) otherwise "Marketo REST API Authentication failed, please check your credentials", // Parsing access token from Json accessTokenStr = TokenJson [access_token] in accessTokenStr in FnMktoGetAccessToken |
The function does not take any parameters in input but get those from the configuration worksheet. It produces the access token as an output.
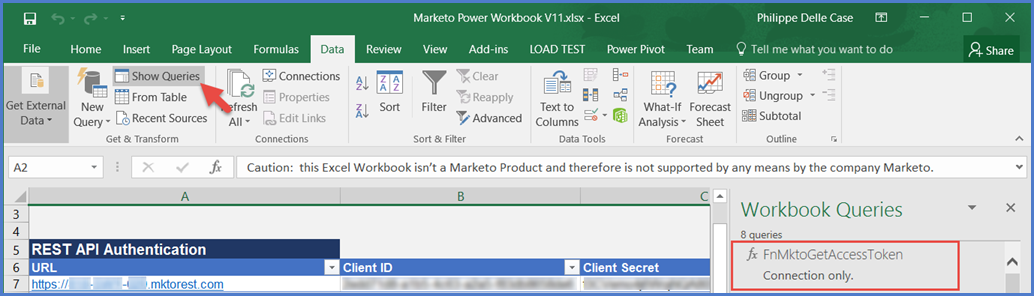
Rename your query FnMktoGetAccessToken and save it.
Note that you can see all your queries at any time in Excel by clicking the button ‘Show Queries’ in the ‘Get & Transform’ section of the Data menu.
Your function should be now marked with the function icon ‘Fx’, just like in the screenshot below:
Load Members of Static List
Get Leads
The Marketo Lead API provides simple CRUD operations against lead records, the ability to modify a lead’s membership in static lists and programs, and initiate Smart Campaign processing for leads. All these capabilities are documented here.
A large set of lead records can be retrieved based on membership in a static list or a program. Using the id of a static list, you can retrieve all lead records which are members of that static list. The id of the list is a path parameter in the call. See the chapter “List and Program Membership” in the Marketo Developers documentation for details.
The maximum number of lead records we can get per API call is 300, so we’ll need to leverage paging tokens in order to gather the records per pages of 300 records. We get the paging token in the Json answer after the first call and we know we’re done when the paging token is not in the output anymore.
Basic Query
Let’s get started with a fully functioning query aimed at downloading all the leads from a static list.
Create a new blank query called ‘MktoLeads’ and enter the following code in the advanced editor:
|
1 2 3 4 5 6 7 8 9 10 11 12 13 14 15 16 17 18 19 20 21 22 23 24 25 26 27 28 29 30 31 32 33 34 35 36 37 38 39 40 41 42 43 44 45 46 47 48 |
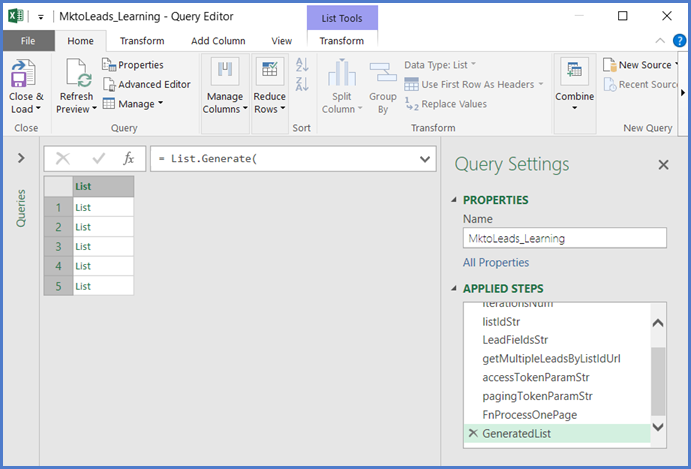
let // Get Url from config worksheet - Table REST_API_Authentication mktoUrlStr = Excel.CurrentWorkbook(){[Name="REST_API_Authentication"]}[Content]{0}[URL], // Get the number of iterations (pages of 300 records) - Table Scoping iterationsNum = Excel.CurrentWorkbook(){[Name="Scoping"]}[Content]{0}[Max Records Pages], // Get the List id - Table Scoping listIdStr = Number.ToText(Excel.CurrentWorkbook(){[Name="Scoping"]}[Content]{0}[List ID], "D", ""), // Get the Lead fields to extract - Table Leads LeadFieldsStr = Excel.CurrentWorkbook(){[Name="Leads"]}[Content]{0}[Lead Fields], // Build Multiple Leads by List Id URL getMultipleLeadsByListIdUrl = mktoUrlStr & "/rest/v1/list/" & listIdStr & "/leads.json?fields=" & LeadFieldsStr, // Build Marketo Access Token URL parameter accessTokenParamStr = "&access_token=" & FnMktoGetAccessToken(), pagingTokenParamStr = "", // Function iterating though the pages FnProcessOnePage = (accessTokenParamStr, pagingTokenParamStr) as record => let // Send REST API Request content = Web.Contents(getMultipleLeadsByListIdUrl & accessTokenParamStr & pagingTokenParamStr), // Recover Json output and watch if token is expired, in that case, regenerate access token newAccessTokenParamStr = if Json.Document(content)[success]=true then accessTokenParamStr else "?access_token=" & FnMktoGetAccessToken(), getMultipleLeadsByListIdJson = if Json.Document(content)[success]=true then Json.Document(content) else Json.Document(Web.Contents(getMultipleLeadsByListIdUrl & newAccessTokenParamStr & pagingTokenParamStr)), // Parse Json outputs: data and next page token data = try getMultipleLeadsByListIdJson[result] otherwise null, next = try "&nextPageToken=" & getMultipleLeadsByListIdJson[nextPageToken] otherwise null, res = [Data=data, Next=next, Access=newAccessTokenParamStr] in res, // Generates a list of values given four functions that generate the initial value initial, test against a condition, and if successful select the result and generate the next value next. An optional parameter, selector, may also be specified GeneratedList = List.Generate( ()=>[i=0, res = FnProcessOnePage(accessTokenParamStr, pagingTokenParamStr)], each [i]<iterationsNum and [res][Data]<>null, each [i=[i]+1, res = FnProcessOnePage([res][Access],[res][Next])], each [res][Data]) in GeneratedList |
Power Query does not offer traditional looping functions (e.g. For-loop, While-loop) and does not support recursion. A good workaround is to implement a For-loop using List.Generate. This function is documented here. With List.Generate it’s possible to iterate over the pages. At each step of the iteration we extract a page of data, keeping the URL that includes the paging token for the next page, and store the results in the next item of the generated list. The blog from Datachant was a great resource for solving this. Our parameter ‘Max Records Pages’ is here to limit the number of pages and restrict it to a realistic range avoiding an infinite loop.
Another challenge is to ensure that the access token is never expired. Tracking its remaining lifespan would be too complex with Power Query. So all calls to the REST API are backed up with an error check; if an error occurs, we assume the token has expired and we renew it first and replay the call again. If the second call fails, then the second failure will be notified to Excel (in the worst case, you’ll get no data as a result).
Launch the query, after saving it or by clicking the ‘Refresh button’ at any time.
In our case, 1364 lead records were extracted fitting in 5 pages of data within 5 lists.
Shaping the Data
We need to shape the data to have all these records in a single flat list of records. There are two ways to do this:
- Using more code
- Leverage the Power Query UI
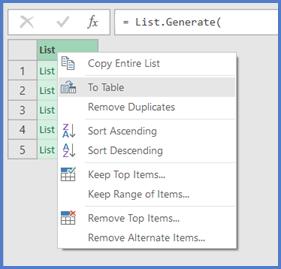
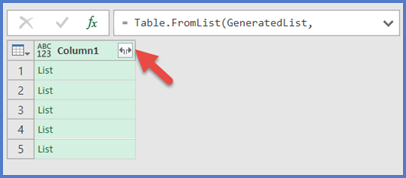
Right click on the output grid and choose ‘To Table’ in the contextual menu in order to convert it to a table of lists.
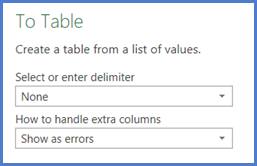
In the ‘To Table’ pop up, leave the default values in the 2 picklists.
Now expand the resulting table of lists.
Now we have all the records in a single list. The records encoded in Json format contain the fields and their associated values. Expand again.
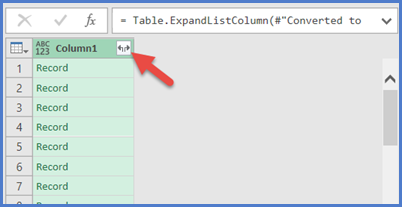
Select in the pop up all the fields you want to keep, uncheck the tick box ‘Use original column name as prefix’.

Et voila! All records are displayed nicely in our table.
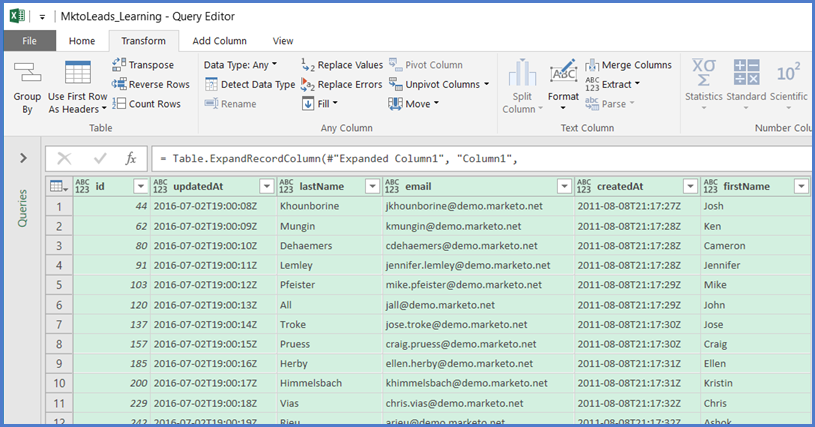
If we re-open the advanced editor, we can see that 3 lines of code have been added to shape our data:
|
1 2 3 |
#"Converted to Table" = Table.FromList(GeneratedList, Splitter.SplitByNothing(), null, null, ExtraValues.Error), #"Expanded Column1" = Table.ExpandListColumn(#"Converted to Table", "Column1"), #"Expanded Column2" = Table.ExpandRecordColumn(#"Expanded Column1", "Column1", {"id", "updatedAt", "lastName", "email", "createdAt", "firstName"}, {"id", "updatedAt", "lastName", "email", "createdAt", "firstName"}) |
You can do much more with Power Query, like creating extra columns with computed values, we’ll see some more possibilities later on.
Let’s save and close this query. It can now be refreshed manually at any time or automatically via background refreshes.
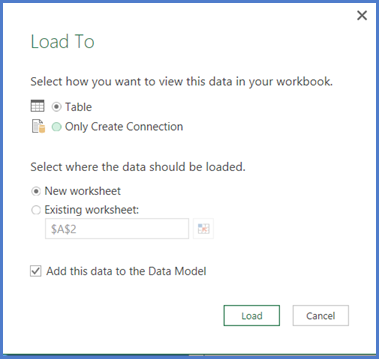
Redirecting the Results
Now the question is, where to send the result data?
Hover over your query with the mouse and select the menu ‘Load To…’ in the contextual menu.
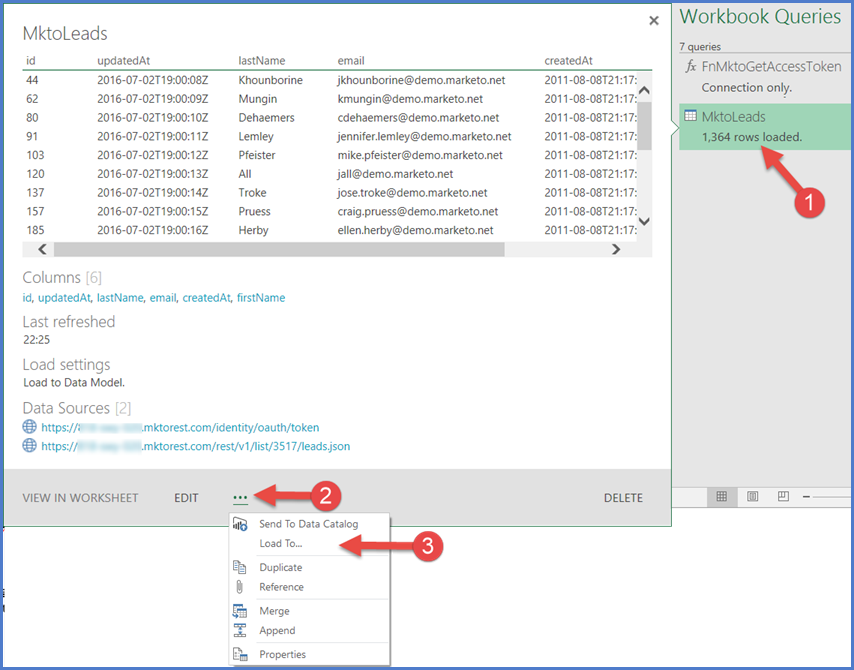
In the popup, then you can select:
- ‘Table’ if you want to send all the shaped data to a worksheet (new or existing one),
- ‘Only Create Connection’ if your goal is to do further analysis in the Power Pivot.
The check box ‘Add this to the Data Model allows you to exploit the data in the Power Pivot; this is what we want for the second part of this article.
Managing Pagination
Since the aim of our project is to build many more queries, let’s do some refactoring and extract a reusable function that would manage the pagination.
Create a new blank query called FnMktoGetPagedData and enter the following code in the advanced editor:
|
1 2 3 4 5 6 7 8 9 10 11 12 13 14 15 16 17 18 19 20 21 22 23 24 25 26 27 28 29 30 31 32 33 34 35 36 37 38 |
let FnMktoGetPagedData =(url, accessTokenParamStr, pagingTokenParamStr)=> let // Get the number of iterations (pages of 300 records) - Table Scoping iterationsNum = Excel.CurrentWorkbook(){[Name="Scoping"]}[Content]{0}[Max Records Pages], // Sub-function iterating though the REST API service result pages FnProcessOnePage = (accessTokenParamStr, pagingTokenParamStr) as record => let // Send REST API Request content = Web.Contents(url& accessTokenParamStr & pagingTokenParamStr), // Recover Json output and watch if token is expired, in that case, regenerate access token newAccessTokenParamStr = if Json.Document(content)[success]=true then accessTokenParamStr else "?access_token=" & FnMktoGetAccessToken(), contentJson = if Json.Document(content)[success]=true then Json.Document(content) else Json.Document(Web.Contents(url & newAccessTokenParamStr & pagingTokenParamStr)), // Parse Json outputs: data and next page token data = try contentJson[result] otherwise null, next = try "&nextPageToken=" & contentJson[nextPageToken] otherwise null, res = [Data=data, Next=next, Access=newAccessTokenParamStr] in res, // Generates a list of values given four functions that generate the initial value initial, test against a condition, and if successful select the result and generate the next value next. An optional parameter, selector, may also be specified GeneratedList = List.Generate( ()=>[i=0, res = FnProcessOnePage(accessTokenParamStr, pagingTokenParamStr)], each [i]<iterationsNum and [res][Data]<>null, each [i=[i]+1, res = FnProcessOnePage([res][Access],[res][Next])], each [res][Data]) in GeneratedList in FnMktoGetPagedData |
Save the query. We are going to use it next.
Simplified Query
Let’s rewrite again our query ‘MktoLeads’ which will be calling the FnMktoGetPagedData function.
|
1 2 3 4 5 6 7 8 9 10 11 12 13 14 15 16 17 18 19 20 21 22 23 24 |
let // Get Url from config worksheet - Table REST_API_Authentication mktoUrlStr = Excel.CurrentWorkbook(){[Name="REST_API_Authentication"]}[Content]{0}[URL], // Get the List id - Table Scoping listIdStr = Number.ToText(Excel.CurrentWorkbook(){[Name="Scoping"]}[Content]{0}[List ID], "D", ""), // Get the Lead fields to extract - Table Leads LeadFieldsStr = Excel.CurrentWorkbook(){[Name="Leads"]}[Content]{0}[Lead Fields], // Build Multiple Leads by List Id URL getMultipleLeadsByListIdUrl = mktoUrlStr & "/rest/v1/list/" & listIdStr & "/leads.json?fields=" & LeadFieldsStr, // Build Marketo Access Token URL parameter accessTokenParamStr = "&access_token=" & FnMktoGetAccessToken(), // No initial paging token required for this call pagingTokenParamStr = "", // Invoke the multiple REST API calls through the FnMktoGetPagedData function result = FnMktoGetPagedData (getMultipleLeadsByListIdUrl , accessTokenParamStr, pagingTokenParamStr) in result |
As you can see, our query is now really simple to read and to maintain. We are going to leverage again the FnMktoGetPagedData function for the other queries.
Load Specific Activities from a Defined Period of Time
get Activities with pagination
Marketo permits a huge variety of activity types related to lead records. Nearly every change, action or flow step is recorded against a lead’s activity log and can be retrieved via the API or leveraged in Smart List and Smart Campaign filters and triggers. Activities are always related back to the lead record via the leadId, corresponding to the Id of the record, and also have a unique integer id of its own. You’ll find the complete REST API documentation here.
There are a very large number of potential activity types, which may vary from subscription to subscription, and have unique definitions for each. While every activity will have its own unique id, leadId and activityDate, the primaryAttributeValueId and primaryAttributeValue will vary in their meaning.
We are going to focus on the Interesting Moments, one kind of Marketo tracked activities with the ID 46.
The new challenges we are going to resolve are:
- We need to initiate a ‘date-based’ paging token to define the period of time when the activities happened,
- Shaping the data is a bit trickier as depending on the activity types, a list of activity-specific attributes is provided in Json and need to be parsed and flatted out in order to ease up the analysis.
Date Based Paging Token
We need to build first this function in order to generate the initial ‘date-based’ paging token, required to scope the period of time for our Activity queries. You’ll find the documentation about the paging token here.
Create a new blank query called FnMktoGetPagingToken and enter the following code in the advanced editor:
|
1 2 3 4 5 6 7 8 9 10 11 12 13 14 15 16 17 18 19 20 21 22 23 24 25 26 27 |
let FnMktoGetPagingToken =(accessTokenStr)=> let // Get url from config worksheet - Table REST_API_Authentication mktoUrlStr = Excel.CurrentWorkbook(){[Name="REST_API_Authentication"]}[Content]{0}[URL], // Get Paging Token SinceDatetime from config worksheet - Table Scoping mktoPTSinceDatetimeStr = DateTime.ToText(Excel.CurrentWorkbook(){[Name="Scoping"]}[Content]{0}[Paging Token SinceDatetime], "yyyy-MM-ddThh:mm:ss"), // Building URL for API Call getPagingTokenUrl = mktoUrlStr & "/rest/v1/activities/pagingtoken.json?access_token=" & accessTokenStr & "&sinceDatetime=" & mktoPTSinceDatetimeStr, // Calling Marketo API Get Paging Token content = Web.Contents(getPagingTokenUrl), // Recover Json output and watch if access token is expired, in that case, regenerate it newAccessTokenStr = if Json.Document(content)[success]=true then accessTokenStr else "?access_token=" & FnMktoGetAccessToken(), pagingTokenJson = if Json.Document(content)[success]=true then Json.Document(content) else Json.Document(Web.Contents(mktoUrlStr & "/rest/v1/activities/pagingtoken.json?access_token=" & newAccessTokenStr & "&sinceDatetime=" & mktoPTSinceDatetimeStr)), // Parsing Paging Token pagingTokenStr = pagingTokenJson[nextPageToken] in pagingTokenStr in FnMktoGetPagingToken |
Save the function. We are going to use it next.
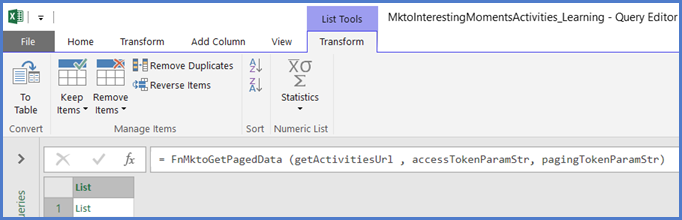
Interesting Moments Activities
Let’s write now the query ‘MktoInterestingMomentsActivities’ which will be calling the FnMktoGetPagedData and FnMktoGetPagingToken functions.
|
1 2 3 4 5 6 7 8 9 10 11 12 13 14 15 16 17 18 19 20 21 22 |
let // Get Url from config worksheet - Table REST_API_Authentication mktoUrlStr = Excel.CurrentWorkbook(){[Name="REST_API_Authentication"]}[Content]{0}[URL], // Get the List id - Table Scoping listIdStr = Number.ToText(Excel.CurrentWorkbook(){[Name="Scoping"]}[Content]{0}[List ID], "D", ""), // Build Get Activities URL getActivitiesUrl = mktoUrlStr & "/rest/v1/activities.json?ListId=" & listIdStr & "&activityTypeIds=46", // Build Marketo Access Token URL parameter accessTokenStr = FnMktoGetAccessToken(), accessTokenParamStr = "&access_token=" & accessTokenStr, // Obtain date-based paging token used to scope in time the activities pagingTokenParamStr = "&nextPageToken=" & FnMktoGetPagingToken(accessTokenStr), // Invoke the multiple REST API calls through the FnMktoGetPagedData function result = FnMktoGetPagedData (getActivitiesUrl , accessTokenParamStr, pagingTokenParamStr) in result |
The result of this query is again a list of lists, so it needs some further data processing to be usable for analysis.
Shaping the Data
Let’s do the same shaping operations we did for the Leads:
- Right click on the output grid and choose ‘To Table’ in the contextual menu in order to convert it to a table of lists,
- Expand the resulting table of lists,
- Expand one more time, selecting in the pop up all the fields you want to keep (uncheck the tick box ‘Use original column name as prefix’).
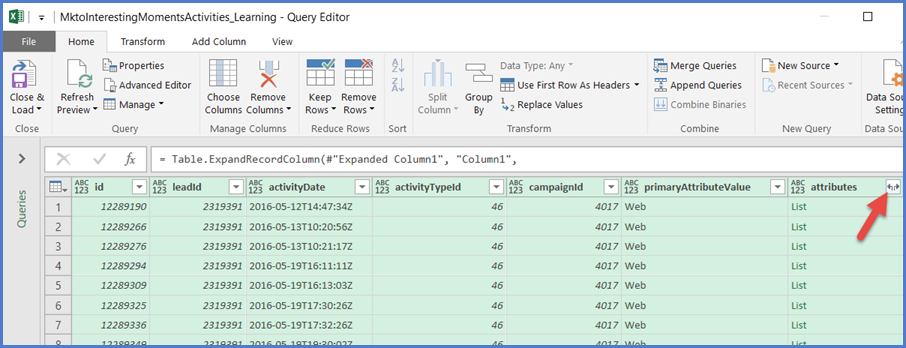
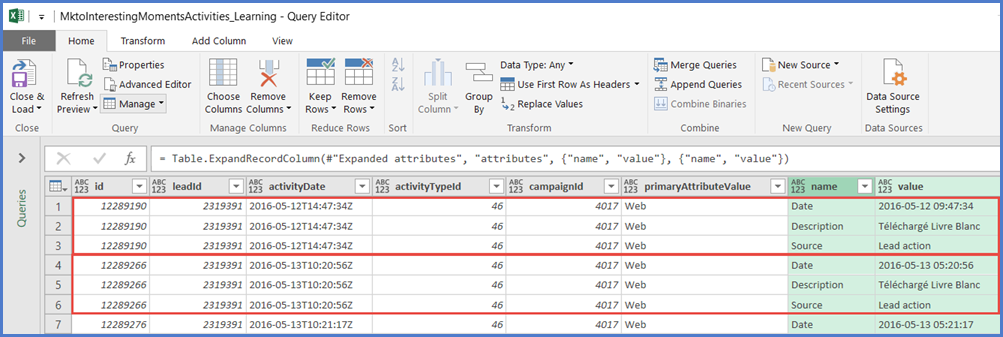
You can see the columns with their values, except the column ‘attributes’ that still contain a list of specific attributes associated to the interesting moments.
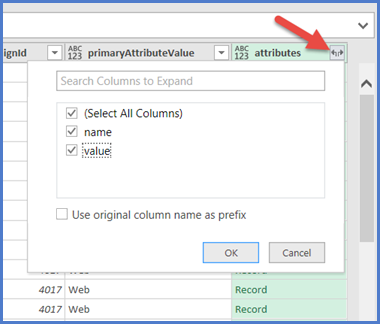
Let’s expand these attributes.
Now the list has expanded into records, we expand again, selecting the fields we want (name and value of each attribute) and we uncheck the tick box ‘use original column name as prefix’.
As a result, all our data are visible, including attributes, but each interesting moment activity is spanned over 3 lines. This is going to be hard to use for our analysis.
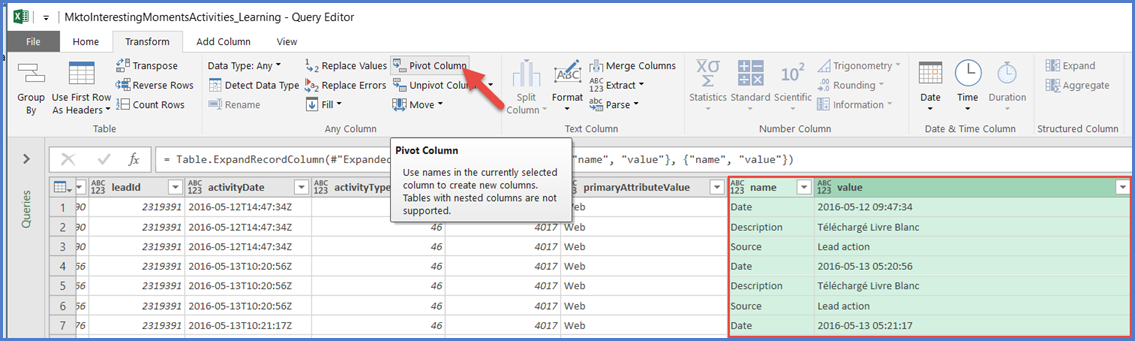
Ideally we want just one line per activity, with all attributes displayed as extra columns. We can easily do that by pivoting the 3 attributes from our table.
Select the 2 columns ‘Name’ and ‘Value’ from the activity attributes and click on ‘Pivot Column’ in the ‘Transform’ menu.
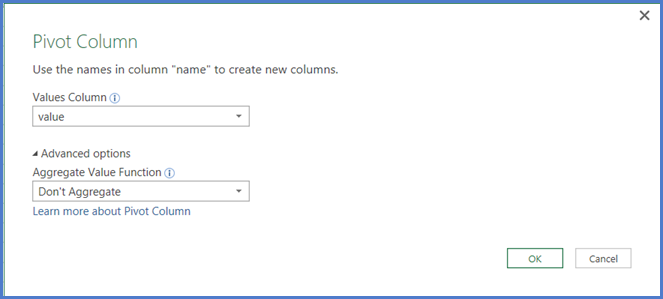
Ask for the advances options in the pop-up and select ‘Values Column’ = value and ‘Don’t aggregate’ value function.
Click ‘OK’ and you have in output one single line of data per activity.
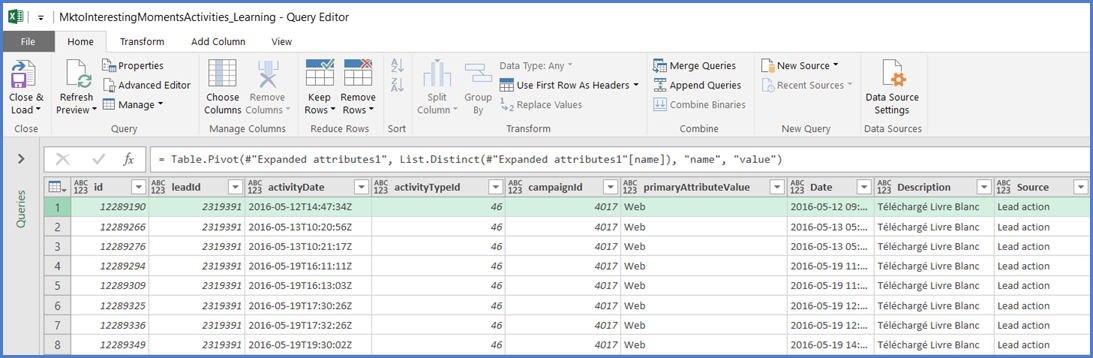
The following ‘data shaping’ lines of code should have been appended automatically to the script of your query:
|
1 2 3 4 5 6 7 8 |
#"Converted to Table" = Table.FromList(result, Splitter.SplitByNothing(), null, null, ExtraValues.Error), #"Expanded Column1" = Table.ExpandListColumn(#"Converted to Table", "Column1"), #"Expanded Column2" = Table.ExpandRecordColumn(#"Expanded Column1", "Column1", {"id", "leadId", "activityDate", "activityTypeId", "campaignId", "primaryAttributeValue", "attributes"}, {"id", "leadId", "activityDate", "activityTypeId", "campaignId", "primaryAttributeValue", "attributes"}), #"Expanded attributes" = Table.ExpandListColumn(#"Expanded Column2", "attributes"), #"Expanded attributes1" = Table.ExpandRecordColumn(#"Expanded attributes", "attributes", {"name", "value"}, {"name", "value"}), #"Pivoted Column" = Table.Pivot(#"Expanded attributes1", List.Distinct(#"Expanded attributes1"[name]), "name", "value") in #"Pivoted Column" |
Next Steps
You should be able now to design all the queries you need to access any specific Marketo data available through its REST APIs.
We hope you enjoyed this article and that it helped you to leverage the great benefits of Excel and Marketo combined.
Please check the second article that provides examples of how to build advanced Marketo reports and cool visualizations with Power Query and Power View. A sample workbook with all queries is also provided in the second article.
References
Marketo
Power Query
- Power Query – Overview and Learning
- Power Query Formula Reference
- Matt Masson Blog provides some good resources about Power Query
- DataChant Blog is very useful for the implementation of the pagination mechanism