Installation instructions for Adobe Launch Marketo extension. The steps below are required to send Push Notifications and/or In-App Messages.
Prerequisites
- Add an application in Marketo Admin (obtain your application Secret Key and Munchkin Id)
- Configure the property in Adobe Launch portal
- Configure application secret key & Munchkin ID for the property in Adobe Launch portal
- Setup Push Notifications (optional)
How to Install Marketo Extension on iOS
Setup Swift Bridging Header
1. Go to File > New > File and Select “Header File”.
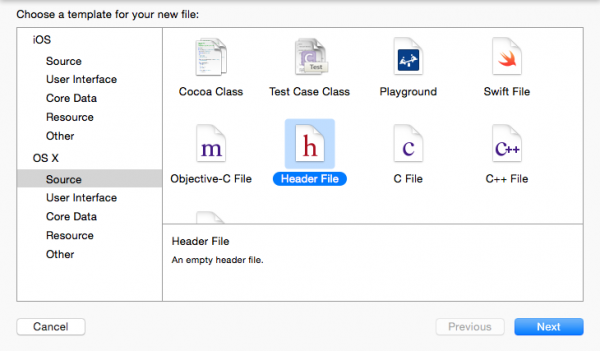
2. Name the file “<ProjectName>-Bridging-Header”.
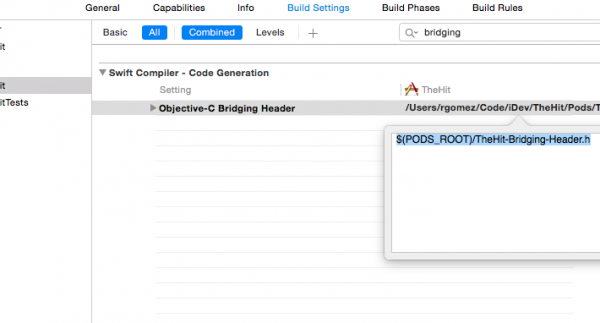
3. Go to Project > Target > Build Settings > Swift Compiler > Code Generation. Add the following path to Objective-Bridging Header:
$(PODS_ROOT)/<ProjectName>-Bridging-Header.h
Initialize Extension
Objective C – Update the applicationDidBecomeActive method like below
|
1 2 3 4 |
(void)applicationDidBecomeActive:(UIApplication*) application { [[ALMarketo sharedInstance] initializeMarketo:nil]; } |
Swift – Update the applicationDidBecomeActive method like below
|
1 2 3 4 |
func applicationDidBecomeActive(_ application: UIApplication) { ALMarketo.sharedInstance().initializeMarketo(nil) } |
iOS Test Devices
1. Select Project > Target > Info > URL Types.
2. Add identifier: ${PRODUCT_NAME}
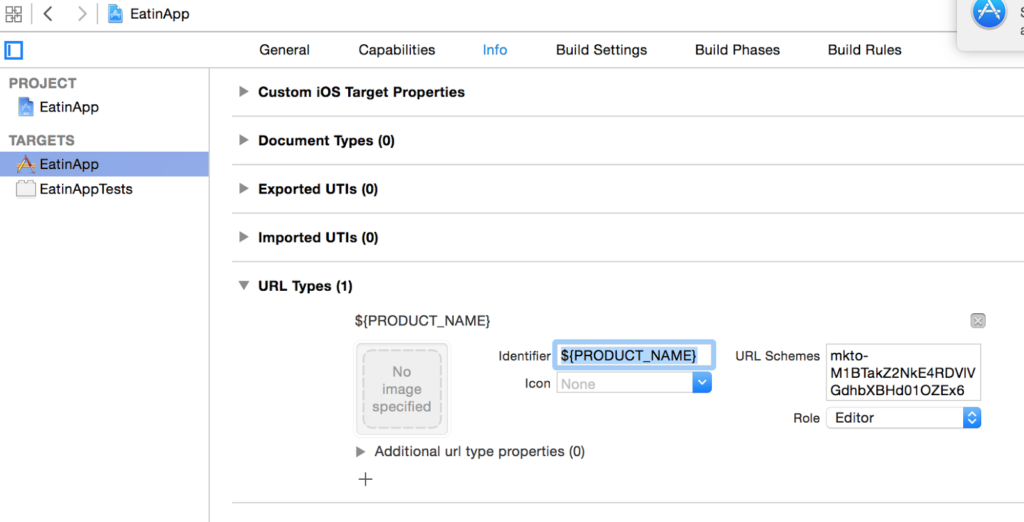
3. Set URL Schemes: mkto-<Secret Key>
4. Include application:openURL:sourceApplication:annotation: to AppDelegate.m file (Objective-C)
Handle Custom Url Type in AppDelegate
1234567891011121314151617181920#ifdef __IPHONE_10_0-(BOOL)application:(UIApplication *)applicationopenURL:(NSURL *)urloptions:(NSDictionary *)options{return [[ALMarketo sharedInstance] application:applicationopenURL:urlsourceApplication:nilannotation:nil];}#endif- (BOOL)application:(UIApplication *)applicationopenURL:(NSURL *)urlsourceApplication:(NSString *)sourceApplicationannotation:(id)annotation {return [[ALMarketo sharedInstance] application:applicationopenURL:urlsourceApplication:nilannotation:nil];}
123func application(_ application: UIApplication, open url: URL, sourceApplication: String?, annotation: Any) -> Bool {return ALMarketo.sharedInstance().application(application, open: url, sourceApplication: nil, annotation: nil)}
How to Install Marketo SDK on Android
Android Extension Setup
Follow instructions in Adobe Launch portal
Configure Permissions
Open AndroidManifest.xml and add following permissions. Your app must request the “INTERNET” and “ACCESS_NETWORK_STATE” permissions. If your app already requests these permissions, then skip this step.
-
12<uses‐permission android:name="android.permission.INTERNET"></uses‐permission><uses‐permission android:name="android.permission.ACCESS_NETWORK_STATE"></uses‐permission>
Initialize Extension
ProGuard Configuration (Optional)
If you are using ProGuard for your app, then add the following lines in your proguard.cfg file. The file will be located within your project folder. Adding this code will exclude the Marketo SDK from the obfuscation process.
123-dontwarn com.marketo.*-dontnote com.marketo.*-keep class com.marketo.**{ *; }
Android Test Devices
Add “MarketoActivity” to AndroidManifest.xml file inside application tag.
12345678<activity android:name="com.marketo.MarketoActivity" android:configChanges="orientation|screenSize" ><intent-filter android:label="MarketoActivity" ><action android:name="android.intent.action.VIEW"/><category android:name="android.intent.category.DEFAULT"/><category android:name="android.intent.category.BROWSABLE"/><data android:host="add_test_device" android:scheme="mkto" /></intent-filter></activity>
Firebase Cloud Messaging Support
The MME Software Development Kit (SDK) for Android has been updated to a more modern, stable and scalable framework that contains more flexibility and new engineering features for your Android app developer.
Android app developers can now directly use Google’s Firebase Cloud Messaging (FCM) with this SDK.
IMPORTANT: This exciting update will not require your current mobile app users to download a new version of your app, BUT any new app users who download your app after March 31, 2018 will not be able to receive push notifications until you update to the latest version of the SDK.
We will continue to support the previous SDK version until March 31, 2019. Instructions for your Android App Developer: HERE
Adding FCM to your Application
- Integrate latest Marketo Android SDK in Android App. Steps are available at GitHub.
- Configure Firebase App on Firebase Console.
- Create/Add a Project on Firebase Console.
- In the Firebase console, select Add Project.
- Select your GCM project from the list of existing Google Cloud projects, and select Add Firebase.
- In the Firebase welcome screen, select Add Firebase to your Android App.
- Provide your package name and SHA-1, and select Add App. A new
google-services.jsonfile for your Firebase app is downloaded. - Select Continue and follow the detailed instructions for adding the Google Services plugin in Android Studio.
- Navigate to ‘Project Settings’ in Project Overview
- Click on ‘General’ tab. Download the ‘google-services.json’ file.
- Click on ‘Cloud Messaging’ tab. Copy ‘Server Key’ & ‘Sender ID’. Provide these ‘Server Key’ & ‘Sender ID’ to Marketo.
- Configure FCM changes in Android App
-
- Switch to the Project view in Android Studio to see your project root directory
- Move the downloaded ‘google-services.json’ file into your Android app module root directory
- In Project-level build.gradle add the following:
12345buildscript {dependencies {classpath 'com.google.gms:google-services:4.0.0'}} - In App-level build.gradle add the following:
12345dependencies {compile 'com.google.firebase:firebase-core:17.4.0'}// Add to the bottom of the fileapply plugin: 'com.google.gms.google-services' - Finally, click on “Sync now” in the bar that appears in the ID
-
- Edit your app’s manifest
The FCM SDK automatically adds all required permissions as well as the required receiver funtionality. Make sure to remove the following obsolete (and potentially harmful, as they may cause message duplication) elements from your app’s manifest:
123456789101112131415<uses-permission android:name="android.permission.WAKE_LOCK" /><permission android:name="<your-package-name>.permission.C2D_MESSAGE" android:protectionLevel="signature" /><uses-permission android:name="<your-package-name>.permission.C2D_MESSAGE" />...<receiver>android:name="com.google.android.gms.gcm.GcmReceiver"android:exported="true"android:permission="com.google.android.c2dm.permission.SEND"><intent-filter><action android:name="com.google.android.c2dm.intent.RECEIVE" /><category android:name="<your-package-name> /></intent-filter></receiver>
- Create/Add a Project on Firebase Console.
FCM FAQ
Frequently asked questions regarding Firebase Cloud Messaging support.
Q: Where can I find instructions to update to the latest version of the MME SDK?
Instructions can be found on the Marketo Developer Site HERE.
Q: Will updating to the latest version of the SDK require me to publish an updated version of my Android Application to my existing users?
No.
Q: What happens if I don’t upgrade to the latest version of the MME SDK by March 31, 2019?
Existing App Users: Your existing app users will still receive push notifications.
New App Users: Any new app user who downloads your application after March 31, 2019 will not receive push notifications until you update to the latest version of the SDK.
Q: Why do we need to migrate from GCM to FCM for Android?
Google is investing in Firebase, making it our unified mobile platform. Since it was added to Firebase at Google I/O in 2016, FCM has been the recommended replacement for GCM.
Q: What are our target timelines for migration?
Google will turn off GCM service in April 2019, so you should plan to have GCM service migrated by then.
Note: Client SDKs and GCM tokens will continue to work indefinitely.
Q: How does it impact the existing MME customers that have published Android Apps integrated with Marketo Android SDK?
They can migrate an existing GCM client app on Android to Firebase Cloud Messaging (FCM) as follows:
- In the Firebase console, select Add Project.
- Select your GCM project from the list of existing Google Cloud projects, and select Add Firebase.
- In the Firebase welcome screen, select Add Firebase to your Android App.
- Provide your package name and SHA-1, and select Add App. A new google-services.json file for your
- Firebase app is downloaded.
- Select Continue and follow the detailed instructions for adding the Google Services plugin in Android Studio.
Q: Once the FCM support is released in Q4, till when can we continue to support existing Android Apps that have not upgraded to latest SDK?
We will continue to support till March 31, 2019. Then after you must need to use latest SDK and need to migrate from GCM to FCM.
Q: Can the Google GCM App Created on Google Cloud Console be used For FCM Push notification?
Yes, For now we can use the GCM App Created on Google Cloud Console. But As of April 10, 2018, Google will deprecate GCM. The GCM server and client APIs are deprecated and will be removed as soon as April 11, 2019. Migrate GCM apps to Firebase Cloud Messaging (FCM), which inherits the reliable and scalable GCM infrastructure, plus many new features.
Q: Can we target the leads created using the old Marketo SDK which used GCM App ?
Yes. All the leads created using Marketo SDK can be targeted for sending the push notifications.